


Hi,
ST launched in September a very interesting development board(STM32F3-Discovery). It is a very cheap one(I have got myself one for ~10$). It has a debugger integrated(STLINK) and also some great sensors:
- ST MEMS LSM303DLHC, which contains 3 axis accelerometer(to measure acceleration intensity on each axis) and 3 axis magnetometer(to measure angles to a fixed point - the Earth's magnetic North)
- ST MEMS L3GD20, which has 3 axis gyrometer(to measure rotation speed)
This board is very good for automated pilot controller projects.
After unpacking the board I have found that it was supported just by commercial software and tools. As I am an opensource kind of guy I have struggled myself some time to get this working with Eclipse, OpenOCD and a free toolchain, on Linux.
I have used Ubuntu, but I think the process is the same on every distribution. Also, with little adjustments it can work on Windows.
Here are some steps, that you have to follow to get the led blinking example to work:
1. Install Java Runtime Environment. Here are some steps for Ubuntu:
sudo add-apt-repository ppa:webupd8team/java
sudo apt-get update
sudo apt-get install oracle-java8-installer
2. Install Eclipse. Get Eclipse IDE from here (grab the Eclipse IDE for C/C++ Developers) and unpack it somewhere
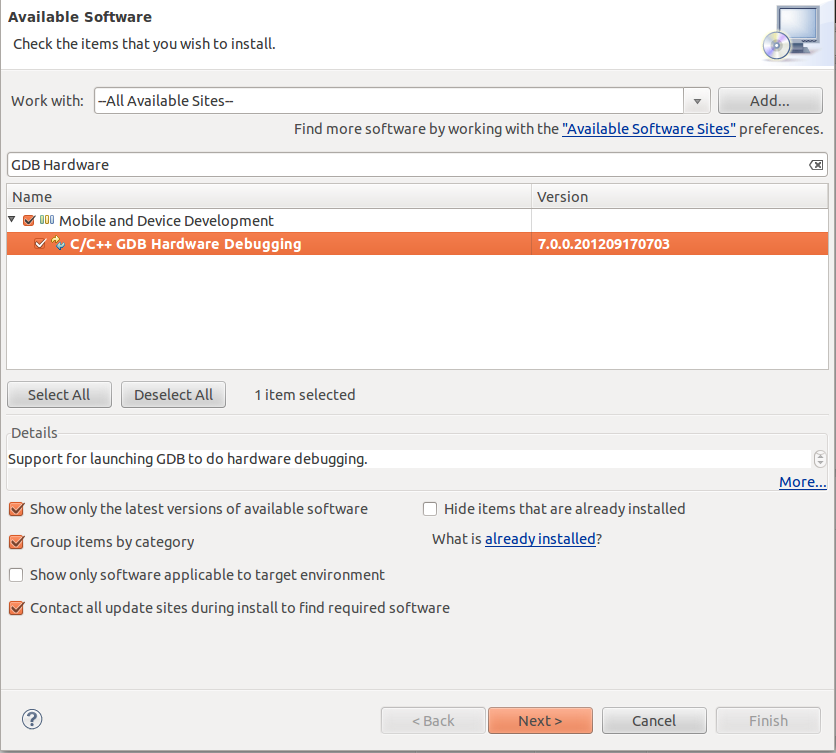
3. Install GDB Hardware Debugging. Open Eclipse go to Help->Install New Software and then search for GDB Hardware Debugging and install it.
Install GNU ARM Eclipse plugin. Get it from here and install it from Help->Install New Software->Add->Archive and select the downloaded .zip file.
4. Install some dependencies. Paste following text in Terminal:
sudo apt-get install git zlib1g-dev libtool flex bison libgmp3-dev libmpfr-dev libncurses5-dev libmpc-dev autoconf texinfo build-essential libftdi-dev libusb-1.0.0-dev
5. Install OpenOCD(version>0.6.1). Get it from here and unpack it. Then, navigate to the extracted folder and type in Terminal:
./configure --enable-maintainer-mode --enable-stlink
make
sudo make install
6. Add rule for Stlink to be accessed without sudo. Type in Terminal:
sudo gedit /etc/udev/rules.d/99-stlink.rules
Paste the following text:
ATTRS{idVendor}=="0483", ATTRS{idProduct}=="3748", MODE="0666"
Type in Terminal:
sudo udevadm control --reload-rules
Now, with the board connected to PC you can enter in Terminal:
openocd -f /usr/local/share/openocd/scripts/board/stm32f3discovery.cfg
The following text should appear:
Open On-Chip Debugger 0.6.1 (2012-10-29-22:02)
Licensed under GNU GPL v2
For bug reports, read
http://openocd.sourceforge.net/doc/doxygen/bugs.html
adapter speed: 1000 kHz
srst_only separate srst_nogate srst_open_drain
Info : clock speed 1000 kHz
Info : stm32f3x.cpu: hardware has 6 breakpoints, 4 watchpoints
You can close the Terminal now.
7. Install toolchain. You can use Codesourcery toolchain, like described in this step, or you can use GCC Arm Embedded toolchain(from here) which has support for hardware floating point unit and which is free and it is easier to install.
For Codesourcery follow the next steps:
Go to Codesourcery and download IA32 GNU/Linux Installer. To install it open the Terminal and navigate to the folder where it is downloaded. Type:
For Codesourcery follow the next steps:
Go to Codesourcery and download IA32 GNU/Linux Installer. To install it open the Terminal and navigate to the folder where it is downloaded. Type:
chmod a+x arm-2012.03-56-arm-none-eabi.bin
./arm-2012.03-56-arm-none-eabi.bin
Then select next at every step.
8. Download sample project. Go to this page and download stm32f3.tar.gz file and unpack it.
9. Open the project in Eclipse. Open Eclipse and go to Workbench. Click File->Import and then select General->Existing Projects into Workspace. Select the downloaded project and click finish.
This is a makefile project, so you have to edit makefile if you want to change some project settings. The frst thing you should do is open the Makefile file and check at the very beginning if the toolchain path is correct. This should be like:
TC = <path_to_toolchain>/arm-none-eabi
Now you can build. right click on project name and select build. The correct output is in the Console tab from Eclipse(ignore the warnings and errors from Problems tab).
10. Debugging. After the project was builded correctly select Run->External Tools->External Tools Configuration. Select OpenOCD(restart) in the left tab and click run.
Now, right click project and select Debug as->Debug Configuration and then
select in the left stm32f3-debug and then click Debug.

Note: If you want to add more source files you can add them in the src folder. New headers should be added into hdr folder. If you want to add another folder you have to specify it like the LIB_SRCS in the Makefile and also create LIB_OBJS like variable in the Makefile.
Happy free coding and debugging! :-)


0 comments:
Post a Comment