Engineering-Diy

  • Subscribe to our RSS feed.
  • Twitter
  • StumbleUpon
  • Reddit
  • Facebook
  • Digg

Saturday, 19 January 2013

Adding 7inch display with touchscreen to Raspberry PI

Posted on 11:59 by Unknown
Hi!

First thing I got in mind when seeing Raspberry PI was "car PC project".
The targeted display was 7 inch with touchscreen. I have found a lot of displays on Ebay.

I have got myself one for 85 dollars with free shipping(this; if it is not available any more you can search "reversing driver board hdmi" on ebay and you will find others). The display driver board has hdmi input and an on board resistive touchpanel with usb controller board.

It took less than a month to receive it(in Romania). After unpack, it worked out of the box with Ubuntu 12.10(display + touchpanel) and with Windows, but for Windows I had to install some drivers also received in the package.

I have installed latest Raspbian image on a SD_Card and tried it on my Raspberry PI model B, but the touchpanel didn't show any input. After searching a lot I have decided that I have to recompile the raspbian kernel and add support for touchpanel. This sounded very new to me but it seemed to be an easy task.

First thing, I have run lsusb to see the touch controller type(on RaspberryPI):
pi@raspberrypi ~ $ lsusb
Bus 001 Device 002: ID 0424:9512 Standard Microsystems Corp.
Bus 001 Device 001: ID 1d6b:0002 Linux Foundation 2.0 root hub
Bus 001 Device 003: ID 0424:ec00 Standard Microsystems Corp.
Bus 001 Device 004: ID 1c4f:0002 SiGma Micro Keyboard TRACER Gamma Ivory
Bus 001 Device 005: ID 0eef:0001 D-WAV Scientific Co., Ltd eGalax TouchScreen
Last device is the touch controller, from eGalax.

Edit: If you don't want to build the kernel by yourself, you can download mine from here. After his, you have to replace file /boot/kernel.img and /lib/firmware and /lib/modules/ on the SD card.

Building a new kernel(in UBUNTU 12.10).
Get kernel sources.
wget https://github.com/raspberrypi/linux/archive/rpi-3.6.y.tar.gz
tar -zxvf  rpi-3.6.y.tar.gz
Install some dependencies.
sudo apt-get install git libncurses5 libncurses5-dev qt4-dev-tools build-essential
Install toolchain.
The best way to do the kernel compilation is on a Desktop/Laptop machine, which will be much more fast than on the Raspberry PI. I have did this in Ubuntu 12.10:
sudo apt-get install gcc-arm-linux-gnueabi
After download of the kernel archive has finished unpack it and then navigate with terminal to the extracted folder.
Be sure thaat the sources objects are cleaned. Type:
make mrproper
Create a folder for the generated kernel:
mkdir ../kernel
Generate the .config file:
make O=../kernel/ ARCH=arm CROSS_COMPILE=/usr/bin/arm-linux-gnueabi- bcmrpi_cutdown_defconfig
Configure the kernel:
make O=../kernel/ ARCH=arm CROSS_COMPILE=/usr/bin/arm-linux-gnueabi- xconfig
In the opened window press the | button to collapse all items. Then, navigate to Device Drivers->Input Device Support->TouchScreens and select it. Here, be sure to check also your touch screen controller if it is other than eGalax, or if it is not selected. Now press save.

With the changes being made you can now compile the kernel:
make O=../kernel/ ARCH=arm CROSS_COMPILE=/usr/bin/arm-linux-gnueabi- -k -j3
Note: -j3 option from the end means to enable parallel build. The number should be number of cpu cores + 1(I have dual core cpu).

The build took about 20 minutes on my PC. After the build completes, you will have the new kernel in ../kernel folder, created above.

Create the kernel image:
cd ../
git clone git://github.com/raspberrypi/tools.git
Note: You need to have git installed.

Navigate to tools/mkimage and then run:
./imagetool-uncompressed.py ../../kernel/arch/arm/boot/Image
This command will generate the kernel image(kernel.img file).

Build modules:
Go back to the linux-rpi-3.6.y folder.
mkdir ../modules/
make modules_install ARCH=arm CROSS_COMPILE=/usr/bin/arm-linux-gnueabi- INSTALL_MOD_PATH=../modules/

Replace the kernel:
Get latest firmware:
wget https://github.com/raspberrypi/firmware/archive/next.tar.gz
tar -zxvf next.tar.gz
In the small partition(/boot) do:
  • replace /boot/bootcode.bin with firmware-next/boot/bootcode.bin
  • replace /boot/kernel.img with the previously created kernel image
  • replace /boot/start.elf with firmware-next/boot/start.elf
In the big partition(/root) do:
  • replace /lib/firmware with <modules_builded_above_folder>/lib/firmware
  • replace /lib/modules with <modules_builded_above_folder>/lib/modules
  • replace /opt/vc with firmware-next/hardfp/opt/vc/
Now your card should contain the new image. Safely eject your SD card and then unplug it from the card reader and then put the card in Raspberry PI and start X(startx). Plug the touch controller in one usb and check if you can move the cursor(or you can start with he touch already plugged in).

After I have started X, my touch input was working but the axes were switched and also not calibrated.

Calibration for the touchscreen(in Raspberry PI). 
Note: The next steps are performed in the Raspberry PI's Debian Wheezy. This is a method for calibrating the touchscreen which will work just for Xserver and Xserver based applications.

Install xinput_calibrator.
Install some dependencies:
sudo apt-get install libx11-dev libxext-dev libxi-dev x11proto-input-dev
Download xinput_calibrator somewhere in the Raspberry PI's folder structure.
wget http://github.com/downloads/tias/xinput_calibrator/xinput_calibrator-0.7.5.tar.gz
Unpack it and then navigate to the unpacked folder and then install it using:
./configure
make
sudo make install
After this step you should run xinput_calibrator(from Xserver terminal console: first startx then open console and then run it).
xinput_calibrator
Follow the on screen instructions(touching some points on screen) and after calibration is complete you will receive a message like this:
Calibrating EVDEV driver for "eGalax Inc. USB TouchController" id=8
    current calibration values (from XInput): min_x=1938, max_x=114 and min_y=1745, max_y=341

Doing dynamic recalibration:
    Setting new calibration data: 121, 1917, 317, 1741


--> Making the calibration permanent <--
  copy the snippet below into '/etc/X11/xorg.conf.d/99-calibration.conf'
Section "InputClass"
    Identifier    "calibration"
    MatchProduct    "eGalax Inc. USB TouchController"
    Option    "Calibration"    "121 1917 317 1741"
    Option    "SwapAxes"    "1"
EndSection

For Raspbian you have to create a file:
sudo nano /usr/share/X11/xorg.conf.d/01-input.conf
Add in this file the content above(starting with Section "InputClass" line) and then save it(ctrl+O).

Note:
Please make sure that you don't have sections like
MatchProduct    "eGalax Inc. USB TouchController"
in other files from /usr/share/X11/xorg.conf.d/ folder(highest number files are processed last, thanks to Jasmin).

Now touchscreen should be calibrated and after reboot it will keep the settings.
Once, I had to run xinput_calibration again in order to have the pointer to the desired points. You can update the numbers given by the xinput_calibration utility in the
usr/share/X11/xorg.conf.d/01-input.conf file in order to have the best calibration at boot.

Soon I will add some pictures.

Andrei
Read More
Posted in 7 inch, calibration, car pc, display, eGalax, kernel rebuild, raspberry pi, raspbian, resistive, touchscreen, ubuntu, wheezy | No comments

Friday, 28 December 2012

STM32F3 Discovery on Windows with Eclipse and OpenOCD

Posted on 15:24 by Unknown
Hi!

Because of a lot of requests, I have decided to make the Windows version of the tutorial for setting up STM32F3-Discovery board, with free tools.

First, download ST-LINK V2 driver from here. Open the archive and install what is in it.
Then plug the device and let the driver install.
Now, get the latest OpenOCD installer from here and extract it somewhere. Copy <openocd_path>\scripts\board\stm32f3discovery.cfg to <openocd_path>\bin folder
Now you should be able to connect to the board in Command Prompt like this:
D:\embedded\openocd-0.7.0-dev-121112115725\bin>openocd-0.7.0-dev-121112115725.ex
e -f stm32f3discovery.cfg
Open On-Chip Debugger 0.7.0-dev-00079-g08ddb19 (2012-11-12-17:14)
Licensed under GNU GPL v2
For bug reports, read
        http://openocd.sourceforge.net/doc/doxygen/bugs.html
adapter speed: 1000 kHz
srst_only separate srst_nogate srst_open_drain
Info : clock speed 1000 kHz
Info : stm32f3x.cpu: hardware has 6 breakpoints, 4 watchpoints
Now close the Command Prompt.

Download latest Eclipse.
Go to Eclipse download page and download Eclipse IDE for C/C++ developers. Extract it and start eclipse.exe. Go to Workbench.

Set up Eclipse.
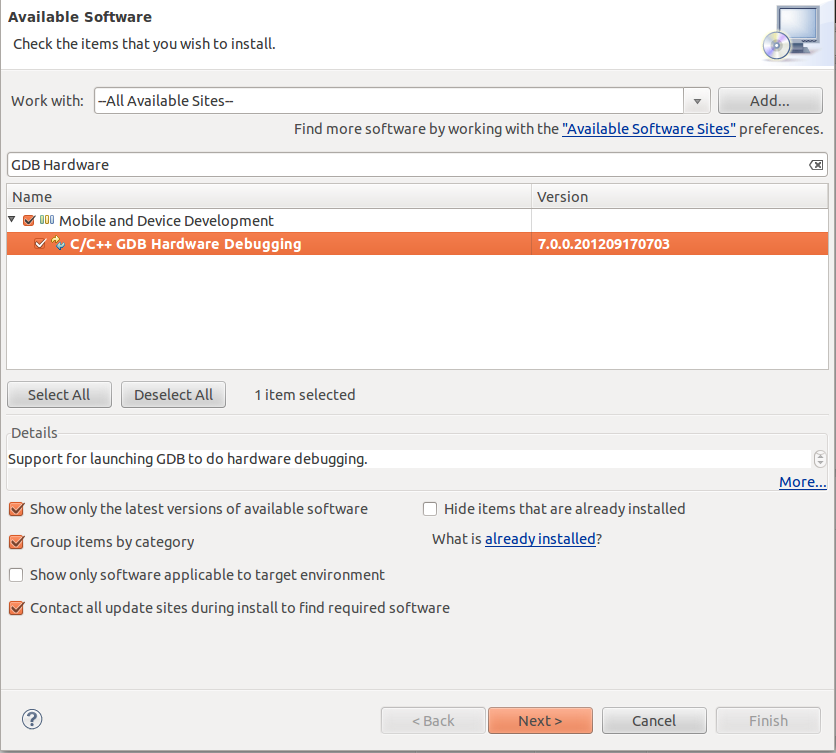
Go to Help->Install New Software, select All Available Sites in Work With dropdown list. Enter "GDB Hardware Debugging" in the search box and install the package. Download Arm Eclipse Plugin from here and then go to Help->Install New Software in Eclipse. Click Add and then click archive and select the previous downloaded file. Then select the packet and install it.

Install GCC Arm Embedded toolchain from here.

Now we need some Linux tools like make and rm for Windows. Download Cygwin from here. Select whichever mirror you want. Search for "make" and select the binary from Devel dropdown. Click next and wait for it to install.
Now, download this project and import it in Eclipse Workspace. Right click project and select  Properties->C/C++ Build->Environment. Here, check if PATH variable has link to toolchain and to Cygwin binaries folders. Here, you can add <gcc-arm-none-eabi-4_6-2012q4/arm-none-eabi/include> path for the Eclipse IDE to find some headers like stdint.h.
If everything  was installed correctly you should be able to clean the project and to build it.

With the project selected, click Run->External Tools->External Tools Configurations and select from the left the configuration named OpenOCD(win). Check if the path for OpenOCD at top is correct.
Now, click Run.

After this, click Run->Debug Configurations and select from the left Navigation-debug. In the Debugger tab check if the arm-none-eabi-gdb.exe path is correct. Now click Debug and you should see the Debug Window from Eclipse and the Program counter pointing at the first instruction from main().

Read More
Posted in cortex m4, discovery, eclipse, embedded, linux, openocd, stm32f3, tutorial, windows | No comments

Wednesday, 28 November 2012

STM32F3-Discovery Usart with printf

Posted on 10:11 by Unknown
Hi,

The next step after setting up the Development Environment for STM32F3-Discovery was to communicate with computer via serial port.
I have added usart support to my board using USART2 module, which had TX connected to PA2 pin and RX to PA3 pin(both with alternate function set to 7).

The next step was to connect the pins to PC serial port. I have used a MAX3232 module(note that you need a chip with 3.3V support).

After using printf function I have noticed that linker asks for some functions like _write which are used internally. I have added a file newlib_subs.c to implement these function.

You can download the example project from here.
The settings for usart communication are:
baudrate: 115200
parity: none
data bits: 8
stop bits: 1
flow control: none

If you want to use interrupts to read from USART you can use the code from here.

You can check my project via svn from my repository using:
svn checkout http://andrei-development.googlecode.com/svn/branches/dev/stm32f3-discovery


Read More
Posted in cortex m4, discovery, eclipse, embedded, linux, openocd, printf, stm32f3, tutorial, ubuntu, usart | No comments

Wednesday, 21 November 2012

Free ARM toolchain with floating point unit support

Posted on 13:14 by Unknown
Hi,

The previous post(STM32F3 Discovery + Eclipse + OpenOCD) was based on the CodeSourcery Lite toolchain, which doesn't support floating point unit.
I have found an alternative: gcc-arm-embedded

You just have to download the Linux installation tarball and unpack it somewhere. After this, you have to edit the file Makefile from the project from this or this post and set TC variable to the new toolchain.
You have to set it like this:
TC = /path_to_toolchain/gcc-arm-none-eabi-x_x-xxxxqx/bin/arm-none-eabi
There is another way, like I did. Enter in Terminal:
gedit ~/.bashrc
add the line at the end of the file:
PATH=$PATH:/path_to_toolchain/gcc-arm-none-eabi-x_x-xxxxqx/bin/
then save and close the file and then enter in Terminal:
source ~/.bashrc
Now you can run arm-none-eabi-gcc in every folder you like. For this case, you should set the TC just like in the picture above.

Then, you have to scroll down and find FPU variable
and set it like this:
FPU = -mfpu=fpv4-sp-d16 -mfloat-abi=hard

Now you are ready to develop great things.

Happy coding!
Read More
Posted in | No comments

Saturday, 17 November 2012

STM32F3 Discovery + Eclipse + OpenOCD

Posted on 02:47 by Unknown
Hi,

ST launched in September a very interesting development board(STM32F3-Discovery). It is a very cheap one(I have got myself one for ~10$). It has a debugger integrated(STLINK) and also some great sensors:
- ST MEMS LSM303DLHC, which contains 3 axis accelerometer(to measure acceleration intensity on each axis) and 3 axis magnetometer(to measure angles to a fixed point - the Earth's magnetic North)
- ST MEMS L3GD20, which has 3 axis gyrometer(to measure rotation speed)
This board is very good for automated pilot controller projects.

After unpacking the board I have found that it was supported just by commercial software and tools. As I am an opensource kind of guy I have struggled myself some time to get this working with Eclipse, OpenOCD and a free toolchain, on Linux.
I have used Ubuntu, but I think the process is the same on every distribution. Also, with little adjustments it can work on Windows.

Here are some steps, that you have to follow to get the led blinking example to work:
1. Install Java Runtime Environment. Here are some steps for Ubuntu:
sudo add-apt-repository ppa:webupd8team/java
sudo apt-get update
sudo apt-get install oracle-java8-installer

2. Install Eclipse. Get Eclipse IDE from here (grab the Eclipse IDE for C/C++ Developers) and unpack it somewhere

3. Install GDB Hardware Debugging. Open Eclipse go to Help->Install New Software and then search for GDB Hardware Debugging and install it.

   Install GNU ARM Eclipse plugin. Get it from here and install it from Help->Install New Software->Add->Archive and select the downloaded .zip file.

4. Install some dependencies. Paste following text in Terminal:
sudo apt-get install git zlib1g-dev libtool flex bison libgmp3-dev libmpfr-dev libncurses5-dev libmpc-dev autoconf texinfo build-essential libftdi-dev libusb-1.0.0-dev

5. Install OpenOCD(version>0.6.1). Get it from here and unpack it. Then, navigate to the extracted folder and type in Terminal:
./configure --enable-maintainer-mode --enable-stlink 
make 
sudo make install

6. Add rule for Stlink to be accessed without sudo. Type in Terminal:
sudo gedit /etc/udev/rules.d/99-stlink.rules
Paste the following text:
ATTRS{idVendor}=="0483", ATTRS{idProduct}=="3748", MODE="0666"
Type in Terminal:
sudo udevadm control --reload-rules
Now, with the board connected to PC you can enter  in Terminal:
openocd -f /usr/local/share/openocd/scripts/board/stm32f3discovery.cfg
The following text should appear:
Open On-Chip Debugger 0.6.1 (2012-10-29-22:02)
Licensed under GNU GPL v2
For bug reports, read
    http://openocd.sourceforge.net/doc/doxygen/bugs.html
adapter speed: 1000 kHz
srst_only separate srst_nogate srst_open_drain
Info : clock speed 1000 kHz
Info : stm32f3x.cpu: hardware has 6 breakpoints, 4 watchpoints
You can close the Terminal now.

7. Install toolchain.  You can use Codesourcery toolchain, like described in this step, or you can use GCC Arm Embedded toolchain(from here) which has support for hardware floating point unit and which is free and it is easier to install.
For Codesourcery follow the next steps:
Go to Codesourcery and download IA32 GNU/Linux Installer. To install it open the Terminal and navigate to the folder where it is downloaded. Type:
chmod a+x arm-2012.03-56-arm-none-eabi.bin 
./arm-2012.03-56-arm-none-eabi.bin
Then select next at every step. 

8. Download sample project. Go to this page and download stm32f3.tar.gz file and unpack it.

9. Open the project in Eclipse. Open Eclipse and go to Workbench. Click File->Import and then select General->Existing Projects into Workspace. Select the downloaded project and click finish.
This is a makefile project, so you have to edit makefile if you want to change some project settings. The frst thing you should do is open the Makefile file and check at the very beginning if the toolchain path is correct. This should be like:
TC = <path_to_toolchain>/arm-none-eabi
Now you can build. right click on project name and select build. The correct output is in the Console tab from Eclipse(ignore the warnings and errors from Problems tab).

10. Debugging. After the project was builded correctly select Run->External Tools->External Tools Configuration. Select OpenOCD(restart) in the left tab and click run.
Now, right click project and select Debug as->Debug Configuration and then
select in the left stm32f3-debug and then click Debug.
Note: If you want to add more source files you can add them in the src folder. New headers should be added into hdr folder. If you want to add another folder you have to specify it like the LIB_SRCS in the Makefile and also create LIB_OBJS like variable in the Makefile.

Happy free coding and debugging! :-)
Read More
Posted in cortex m4, discovery, eclipse, embedded, linux, openocd, stm32f3, tutorial, ubuntu | No comments
Newer Posts Home
Subscribe to: Posts (Atom)

Popular Posts

  • STM32F3-Discovery Usart with printf
    Hi, The next step after setting up the Development Environment for STM32F3-Discovery was to communicate with computer via serial port. I hav...
  • Keep your linux clock synchronized with gps time
    A big problem for a CarPC is that you need a real time clock to synchronize your system with. For my CarPC, I don't have any RTC module ...
  • STM32F3 Discovery on Windows with Eclipse and OpenOCD
    Hi! Because of a lot of requests, I have decided to make the Windows version of the tutorial for setting up STM32F3-Discovery board, with fr...
  • Control XBMC from the Raspberry PI GPIO's
    I have recently worked on adding external controls for my Raspberry PI CarPC project because while driving it is better to have some physica...
  • Adding 7inch display with touchscreen to Raspberry PI
    Hi! First thing I got in mind when seeing Raspberry PI was "car PC project". The targeted display was 7 inch with touchscreen. I h...
  • Car PC project(August 2013 update)
    This is an update for my CarPC project. You can download the latest image from here (username:'pi', password:'a') The main f...
  • Raspberry PI, Raspbian, XBMC and eGalax 7 inch touchscreen
    Hello! I have spent some time lately trying to find a solution to get my 7 inch eGalax touchscreen to work with  Raspbian(Debian Wheezy) in ...
  • OpenElec with support for eGalax touch screen
    Hi! Lately I have tested OpenElec for Raspberry PI and found out that it is very very fast, very very small and also it has some great addon...
  • Build XBMC Frodo from source in Raspbian on Raspberry PI
    Hi! After struggling couple of days in finding the best way to build XBMC on Raspberry PI I have finally got a working solution(haven't ...
  • STM32F3 Discovery + Eclipse + OpenOCD
    Hi, ST launched in September a very interesting development board( STM32F3-Discovery ). It is a very cheap one(I have got myself one for ~10...

Categories

  • 7 inch
  • calibration
  • car pc
  • compile xbmc
  • controller
  • cortex m4
  • date
  • debian wheezy
  • discovery
  • display
  • eclipse
  • eGalax
  • embedded
  • gpio
  • GPS
  • kernel rebuild
  • linux
  • navigation
  • Navit
  • openElec
  • openocd
  • Openstreetmap
  • printf
  • push button
  • raspberry pi
  • raspbian
  • resistive
  • stm32f3
  • synchronization
  • touch screen
  • touchscreen
  • tutorial
  • ubuntu
  • usart
  • wheezy
  • windows
  • xbmc
  • xbmc 12
  • xbmc 12.2
  • xbmc frodo

Blog Archive

  • ▼  2013 (8)
    • ▼  November (1)
      • Control XBMC from the Raspberry PI GPIO's
    • ►  October (1)
    • ►  August (2)
    • ►  July (1)
    • ►  February (2)
    • ►  January (1)
  • ►  2012 (4)
    • ►  December (1)
    • ►  November (3)
Powered by Blogger.

About Me

Unknown
View my complete profile